Building my first FPV drone from scratch - part 2
From part 1 of this series, you may recall the plan so far:
- Buy the parts
- Assemble the parts <– I AM HERE
- Learn to fly FPV
- Fail, fix, improve
- Strap lasers to the whole setup!
Putting things together
I am still waiting for my FPV goggles to arrive from Banggood. My original order in December was clearly lost somewhere along the journey but customer support have resent one without any fuss. However the new one is still in transit from Belgium 2 weeks later.
On the other hand, the re-sent battery arrived in just a couple days. With that, I felt confident to start the epic road of assembling the quadcopter knowing that I had a means to test whether my connections were functional.
I have been diligently following the steps outlined in the $99 quadcopter build tutorial from UAVFutures below.
However, there have been a number of key details that were either glossed over or just not mentioned in that original video so I’ve had to update the recipe slightly. I’m jotting down my actual build steps here to help both myself and anyone else that may face similar problems starting the hobby as an absolute beginner.
Despite the surprise extra steps, I really enjoyed discovering many more brilliant FPV dronebuilding content creators and resources across the web. It really seems to be a hobby that has attracted a wealth of passionate and generous personalities.
Build Recipe (Pics to be included…)
-
Screw motors onto the base frame
-
Screw ESC board into middle of frame
-
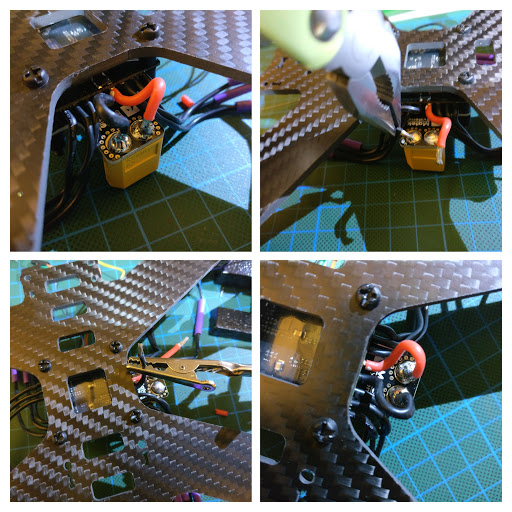
Solder the motors to the ESC (don’t forget the heatshrink!)
-
Solder battery connector to PDB
-
Screw PDB on top of ESC
-
Solder ESC to PDB
-
Solder VTX & Camera to each other, and to the PDB
-
Solder FC to PDB
- Screw FC on top of PDB
-
Solder Rx to FC
-
Make sure Rx is bound to your Tx (radio)
My FlySky i6S (v3.0) came with a quickstart guide that was a little too quick. You might want to check out the full pdf manual too in order to understand this bit of kit in a bit more detail.
-
Update FC firmware
This step was particularly painful as I somehow managed to ‘brick’ (render completely useless & unresponsive) my flight controller. This was additional stress after a hunt to find the appropriate drivers to enable my Macbook to recognise that the FC was connected via USB.
Luckily, you can recover a bricked controller by following a few straightforward steps. However, a key requisite for that involved creating a shortcircuit between 2 holes in the board (labelled ‘boot’). After much panic that I might have to solder something horrific and then de-solder it, I realised that a bit of tin foil would do the trick just fine.
CleanFlight vs BetaFlight - what software should I be using to setup my FC?
BetaFlight started as an evolution of CleanFlight in order to test new features. It quickly became a better performing all-round stable product but the name had already stuck. So BetaFlight ftw.
How to get BetaFlight to recognise your FC plugged in via USB on Mac
i. Try this VCP driver download.
ii. Try this one too from Silicon Labs in case the first one didn’t make a difference.
How to recover a bricked SP Racing F3 FC by flashing the proper firmware.
i. Short circuit the boot sockets on your FC
ii. Choose your firmware to flash with the following options enabled
- "No reboot sequence" - "Flash on connect" - "Full chip erase" - "Manual baud rate" set at 256000 iii. Power on the board - Betaflight should flash (aka install) the firmware as soon as it connects. You'll know when it's done when the red light on the FC starts flashing (and it'll say so at the bottom of the BetaFlight window). iv. Power off the board and remove the boot shortcircuit. v. The board should work as expected when you reconnect the power -
Setup Tx to output on correct channels
This video from Painless360 guides through setting up the exact same radio.
- Verify FC receives on correct channels
- Match FC config to motors wiring setup
-
Remove throttle spring on Tx
Painless 360 has an excellent video walkthrough on this that also helped explain the mystery strip of metal that was also included in the box of my FlySky FS i6S (v3.0).
- Verify power and control of motors <- I AM HERE
- Activate all the heatshrink (now you’re sure that you won’t need to resolder any joins)
- Attach propellers
- Maiden voyage
- Setup goggles to receive camera footage via VTx
- Maiden FPV voyage


You can checkout part 3 of this series here.